In this article, I’ll sketch a basic guitar amp simulator. For one, questions on the topic come up often, and also, it will be a good example of a typical use of working at a higher sample rate.
The most basic guitar amp simulator has gain, with saturation, tone controls, and a speaker cabinet simulator. Because saturation is a non-linear process, the results are different whether the tone controls come before or after—more on this later. The speaker cabinet, of course, comes last, and is an important part of the tone. Gain with saturation (the overdriven “tube”) is the tricky part—we’ll start there.
Gain with saturation
Gain is simply a multiply. But we like to overdrive guitar amps. That means gain and some form of clipping or softer limiting—that’s what generates the overdrive distortion harmonics we want. Typically, we’d ease into the clipping, more like tube saturation behaves, but the more overdrive gain you use, the closer it gets to hard clipping, as more of the signal is at the hard limit.
That’s where we hit our first DSP problem. Clipping creates harmonics, and there’s no way to say, “Please, only generate harmonics below half the sample rate.” We will have aliasing. The added harmonics fall off in intensity (in much the same way as harmonics of a rectangular wave do), as they extend higher in frequency, but at typical digital audio sample rates, the Nyquist Frequency comes too soon. Aliased images extend back down into the audio range. We can’t filter them out, because they mix with harmonics we want to keep. And because the guitar notes played aren’t likely the be an integer multiple of the sample period, the aliased harmonics are out of tune. Worse, if you bend a guitar note up, the aliased harmonics bend down—that’s where aliasing becomes painfully apparent.
Can we calculate clipping overtones and create just the ones we want? Can we analyze the input and output and remove frequencies that we don’t want? That is not an easy task (left as an exercise for the reader!).
The oversampled solution
To mitigate the aliasing issue, the most practical solution is to give ourselves more frequency headroom before generating distortion harmonics with our saturation stage. If the sample rate is high enough, aliased images are spread far enough apart that the tones extending into our audio range from above are diminished to the point they are obscured by the din of our magnificent, thick, overdriven guitar sound. And when we play delicately or with little overdrive gain, so is the aliasing lessened.
How much headroom?
How much headroom do we need? I’d like to leave that to your situation and experimentation—mostly. But since I started doing this in the days when every DSP cycle was a precious commodity, I can tell you that—for 44.1 kHz sample rate, typically the worst case that we care about—the minimum acceptable oversampling factor is 6x. 8x is a good place to start, and will be adequate for many uses, at a reasonable cost. (Do multistage oversampling for efficiency…but that’s another story.)
Raising the sample rate “8x” sounds like we’ll have eight times the bandwidth, but it’s better than that. At our original 44.1 kHz sample rate, we have a usable bandwidth of about 20 kHz (allowing for the conversion filters), and little addition frequency headroom. If we go past 24.1 kHz (44.1 kHz – 20 kHz), aliasing extends below 20 kHz. But by raising the rate to 8 times the original, we have headroom of 352.8 kHz – 20 kHz, or 332.8 kHz. That’s more than 80 times our original headroom.
The idea is that we upsample the signal (removing anything not in our original audio band), run it though our tube simulator (clipper/saturator), then drop the sample rate back to the original rate (part of this process is again removing frequencies higher than out original audio band).
How much gain?
Real guitar amps have a lot of gain. Don’t think that if your overdrive is adjustable from 0-2 gain factor, you’ll get some good overdrive distortion. That’s only a maximum of 6 dB. More like 60 dB (0-1024)! Maybe up to something like 90 dB for modern, screaming high-gain amps. That’s equivalent to a shift of 15 bits, so I hope you’re using something better than a 16-bit converter (or tracks) to input your raw guitar sound.
The tube
My intent here is not to guide you down the road of yet another guitar amp simulator plugin, but to give an example of a task that needed more frequency headroom, requiring processing at a higher sample rate. But it’s worth going into just a bit of detail on the tube (saturation) element. Again, we’re talking about “first approximations”—a hard clipper, or a soft one.
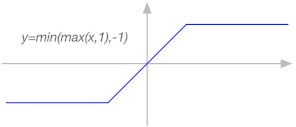
A hard clipper is trivial. If a sample is greater than 1, change it to 1. If less than -1, change it to -1.
if (samp > 1.0)
 samp = 1.0;
else if (samp < -1.0)
  sample = -1.0;
Here’s the transfer function—for input sample values along the x axis, the output is on the y axis. For input { 0.5, 0.8, 1.0, 1.3, 4.2 }, the output is { 0.5, 0.8, 1.0, 1.0, 1.0 }.
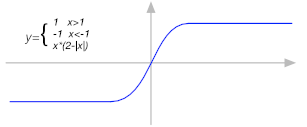
But for this use we’d probably like a softer clip—a transfer function that eases in to the limit. samp = samp > 1 ? 1 : (samp <= -1 ? -1 : samp * (2 – fabs(samp))); This is just a compact way of saying,
if (samp > 1.0)
  samp = 1.0;
else if (samp < -1.0)
  sample = -1.0;
else
  samp = samp * (2 - fabs(samp));
This is a very mild, symmetrical x-squared curve. It’s just an example, but you’ll find it produces useful results. You could try a curve that stays straighter, then curves quicker near +/-1. Or a curve that’s not symmetrical for positive and negative excursions. The harder the curve, the closer we get to our original hard-clipping.
One detail worth noting: If you’ve spent much time looking at discussions of this sort of non-linear transfer function on the web, usenet, or mailing lists, invariably someone points out that we know exactly what order of harmonics will be created, and therefore how much oversampling we might need, based on the polynomial degree. This is wrong—in fact we’re only using the polynomial between the bounds of x from -1 to 1, and substituting a hard clip for all other points. For a use such as this, the input is driven far into the hard clip region, so the polynomial degree is no longer relevant.
Tone controls
We know IIR filters well, so this part is easy. Typically, a guitar amp might have bass, mid, and treble controls. One catch is that if you want to sound like a particular vintage amp, they used passive filters that result in control interaction. That is, not active circuitry that isolate the components from each other. So, adjusting the bass band might affect the mid filtering as well. But that’s fairly easy to adjust for.
More about overdrive and tone
Something worth noting. It you really want to scream with gain, you need to make some architectural adjustments. If you’ve played much with raw distortion pedals with different instruments, you’ve probably noticed that you get a “flatulent” sound with heavy clipping of bass. And high-gain distortion of signals with a lot of highs can sound pretty shrill. Guitar solos really scream when they have a lot of midrange distortion. So, if you really want to go for a screaming lead with loads of distortion without it falling apart into useless grunge, one thing you can do is roll off the lows and highs before the tube sim (distortion) stage. But then the result lacks body—compensate by boost the lows and high back up, after the distortion stage. The point here is that you have three choices of where to put EQ for your amp tone: before the tube, after, or both.
Some of your tone choices can be a property of the amp model—not everything needs to be a knob for the user to control. These choices are what give a particular guitar amp its characteristics. A Fender Twin does not sound like a Marshall Plexi. The reason that well-known guitar amps are the basis of DSP-based simulation is that the choices of their designers have withstood the test of time. Countless competitors faded from memory, often because there choices were as compelling.
Cabinet
Similarly, guitar speakers gained familiar configurations not because the industry got together and chose, but these are the ones that worked out well.
One characteristic of speakers for guitar amps is that they are not full range—you’ll find no tweeters in guitar cabinets. The highs of the large speakers used (most often 10″ and 12″) drop off very quickly. A clean guitar tone doesn’t have strong high frequency harmonics, and the highest note on a guitar is typically below 1 kHz. Overdrive distortion creates powerful high frequency harmonics, but we really don’t want to hear them up very high—extremely harsh and fatiguing to listen to.
The first approximation of a speaker cabinet is simply a lowpass filter, set to maybe 5 kHz. I didn’t say it would be a great cabinet, but it would start to sound like a real guitar amp combo. The next step might be to approximate the response of a real speaker cabinet, miked, with multiple filters.
But if you’re serious, a better start might be to generate impulse responses of various cabinets (4 x 12″, 2 x 10″, etc.), miked at typical positions (center, edge, close, far), with selected mics (dynamic, condenser). Then use convolution to recreate the responses.
Followup
To moderate the size of this article, I’ll follow with images depicting the oversampling process in the next article.
Great post man! I’m looking forward to the oversampling one.
Thank you Nigel! It is always appreciated when you post!
Awesome guide dude, as always!
Example/code? I’d like to see an implementation :love