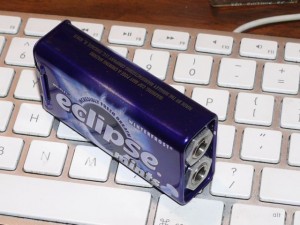
I don’t eat mints often, but when I do, they are sugar free…
A Leslie speaker simulation
Players of Hammond organs and their clones know how important the Leslie speaker is to the classic sound. Modern clones have electronic simulations built-in, with varying degrees of success. The Neo Instruments Ventilator is a particularly convincing DSP-based Leslie simulation in a foot pedal. I was never satisfied with the Leslie simulation in my Korg CX-3 (the modern DSP variety—they also made an electronic-component-based model of the same name circa 1980). Bypassing the internal Leslie simulation in favor of the Ventilator greatly improved my enjoyment of the instrument. (I have a Leslie 122, but it’s in a state of disrepair—besides, an electronic simulation makes it much quicker to record a sudden inspiration.)
But something’s missing
But the Ventilator has a serious omission: no MIDI control. A great advantage of Hammond clones over the real thing is that you can capture your performance via MIDI, then audition alternate drawbar settings and try different Leslie speeds later, in playback, without the need to repeat the performance. Without MIDI control, the Ventilator has no way to capture and play back the simulation of switching Leslie speeds.
To fix this shortcoming, I bought a MIDI-controlled relay (made by MIDI Solutions), as the Ventilator has an external footswitch input. But when I went to integrate it, I found what I deem a design failure in the Ventilator.
The (optional) external controller for the Ventilator has two footswitches, one to control fast or slow modulation, and the other for “brake” (stop). It connects with the Ventilator via a tip-ring-sleeve plug. I don’t use the brake function—I only want to switch fast/slow. but the way the Ventilator is designed, a single relay can’t do the job. To switch to fast speed, one pin goes high and the other low, and to go slow, the two pins switch to the opposites states. This would require two single relays configured to switch in opposite directions.
These MIDI relays aren’t cheap, so the thought of buying another was not a desirable choice. And it was irksome that Neo Instruments could have easily designed the Ventilator to allow a single relay to do the job with no change of other functionality. This would also allow a user to locate the Ventilator on top of the organ, for access to the knobs during performance, and use a simple and cheap single footswitch to switch speed instead of their relatively expensive external dual switch.
The truth
Here’s how they could have have done it (it’s a matter of software, so they could still do it): The tip and ring are each “pulled up” to +5 volts, individually, and are sensed by the processor so that each yield a logical “1” when disconnected, and a logical “0” when connected to ground (the sleeve). This give us two bits, or four possible states. Three states are used—brake, fast, and slow. Here’s the truth table (“0” indicates that the pin is connected to the sleeve—common—and “1” indicates no connection—open):
| Tip | Ring | State |
|---|---|---|
| 0 | 0 | (undefined/unused) |
| 0 | 1 | fast |
| 1 | 0 | slow |
| 1 | 1 | brake |
Note that there is one left over state—an undefined state (not possible to attain with their dual footswitch). However, if the Ventilator had been designed to use this state as a redundant speed selector, the device would work with either a single switch (SPST—single-pole single-throw), or their dual footswitch with no change.
The fix
OK, how do I fix this slight, and use my MIDI relay for speed switching? One choice would be to modify the MIDI relay. I popped it open, and found that the output jack is already a TRS connector, so I had all the pins I needed. I could try to find a small dual relay (SPDT—single-pole, double-throw), but even if I could, it’s possible there would be switching problems if I didn’t have enough current available (the MIDI relay box is powered from the MIDI current loop). While this would let the MIDI relay switch speeds, it wouldn’t let me use a simple single footswitch as an alternative, and I’d like that option. Alternatively, I could build a mod into the Ventilator—this is probably the easiest and most flexible choice, since I’d have access to the Ventilator’s power supply. After some thought, I decided that I’d prefer building an external adapter instead, leaving the Ventilator unaltered.
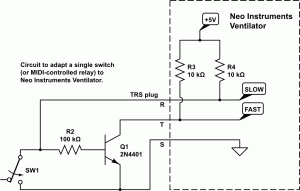
The biggest issue of an external adapter is that I didn’t want to use a battery. Since the Ventilator pulls the tip and ring pins up to +5 volts through resistors, internally, I needed a solution that tapped that current for power. Fortunately, the solution requires only a single transistor and resistor. When the input switch is closed, the NPN transistor switch opens, and when the switch opens, the NPN turns on and closes the connection.
Great, a small, simple circuit. But not small enough to fit in the shell of a connector, so I needed to put it in a box…
Building it
About the mints…Eclipse mints are sugar-free and come in these cool little metal boxes with a hinged, snap-shut lid. I’ve kept them instead of tossing them in the recycle bin—it seemed they could be handy for something. The only use I’d found so far is as a temporary holder of screws when I’m fixing gear, but I took a close look at one for this project. Yes, the dimensions are ideal for two 1/4″ phone jacks, with enough room left over for my circuit board and wiring inside.
Here’ s a circuit diagram—click to see a larger view, or go here to run a circuit simulation:
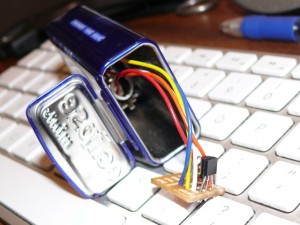
One transistor, one resistor, and a few jumpers on a prototyping board is all it takes. Trim the circuit board—easily under a half square inch. Drill a couple of 3/8″ holes for the jacks, and feed them through the open end with needle nose pliers. The metal’s thin, but once you tighten the nuts everything firms up again. Cost: $1.59 for the prototyping board, 69 cents per jack. I had the transistor (you can substitute other common small-signal NPN transistors) and resistor on hand, but you can find them for about $1.50 for packs of four or five.
Here’s a view before securing the board to the inside of the box with adhesive-backed foam tape:
The input connected to the relay or footswitch with a mono cable, and the output to the Ventilator with a stereo cable. I installed the output jack next to the twin mints of the box graphics as a reminder.
My CX-3 accepts a simple momentary footswitch to toggle Leslie simulation speeds, in turn outputting a MIDI control change that can toggle the MIDI relay. Since the MIDI relay box has a MIDI output that passes the MIDI notes and control changes, I can record notes and speed switching for playback later.


